Monday, 28 November 2016

Benefit Present Box


On the left you can see what it comes in and on the right you can see how it look when you open it. I feel like guys can give this for christmas for their girlfriend, sister or just best friends and if they like makeup they'll love this. I got this in the INNO (Belgium) and it was €49 ($53) but it is worth about €68 ($74) so that's a good deal, you save about €20 ($22) . If you buy it on the benefit site it will be €9 ($10) less but then you'll have to pay to get it here and so it will come at more expensieve, so just get it at the store. It's still less then what it's worth.


Okay so in the box you'll find 4 benefit products, the hoola bronzer, benetint, they're real mascara and of course the porefessional primer. If you watch any beauty guru you will for sure have heard about any of these, like porefessional primer I see it everywhere! Now I have finally got my hands on these products and I'm so excited. Honestly though I expected more of the porefessional but don't get me wrong I'm so happy with it and it smells amazing and on your skin it feels SO good! The bronzer is honestly my favorite thing in this. Benetint I have to test it out more as blush to make it look good but as lip stainer great! The mascara is good but I have short lashes so.. I like it on me but I mean you won't see it as fast on me then on people with long lashes, which I think would look great! It is really black though so you do see a difference and on the bottom lashes it looks great.


If you're a makeup lover I would definitely get it or ask it for christmas because it's something you'll love in your makeup collection, for a good price! Boys/men get this for your girl or your sister or mom, you can also find different ones but this is the one I liked. Short little blog about some makeup and as well a christmas gift idea for a girl! As always I hope you all enjoyed this post and follow me by email, on bloglovin' or on twitter to be updated when I post.

Love always, 
Fauve♡

Monday, 21 November 2016

Walk in the Woods


My dad loves going on long walks and I go with him a lot, this time my mom and sister came with us as well and we all took some pictures. These pics are from my mom, sister and I. We all like taking pictures and nature and going to the woods and feel the fresh air and the smell of the trees and leaves. We like going for walks at the beach as well but that's a bit more chilly this time of the year, we still do it though haha. We found some big cool mushrooms as well, hidden of course but we saw some people looking at something so we went to take a look and luckily we did.


When we go on these walks we talk a lot, about literally everything we can come up with. We laugh a lot, we get mad as well though but we forget that pretty quickly by acting silly. Do you guys go on walks a lot? I feel like going on walks is a fun activity to do with anyone really? With friends, family, significant other or with your pet, you can even go by yourself to just be zen. Walks are honestly pretty fun after a while. You might be a teen and not feeling like going on walks with you father or mother or just going on walks but if you just do it, you'll probs like it after a walk or two. Try it, hang out with the fam or yeah go with friends or your dog.


Nature really calms me down, even just looking at these pictures or maybe it's just the music I'm listening to, haha no no it's the pics. I'm really liking making blogposts, even though not a lot of people read it. I enjoy doing it for myself and of course for some of you who keep reading it! Maybe one day I'll make a more pro looking blog but for now, I'm liking this. Follow me on twitter or bloglovin' to keep updated when I post. As always I hope you all enjoyed this post, bye. 

Love always, 
Fauve♡ 

Monday, 14 November 2016

Three lip Shades for Autumn

These are the three lip shades I like for Autumn and Winter but like let's be honest if you wanne use it all year around you can do it because you do you boo! The top one is embellishment, purply color, I love! The second one is teddy, such a cute name, dark brown color also love! Last color is Copenhagen, a pretty bordeaux/dark red color.


All these colors you can build up but all of them are pretty with one coat as well. The incredible thing is that the red one has the most product in it. I would've loved that the other 2 had more product in them but yeah also I can't find them in the nyx in Belgium, Ghent anymore. The whole lingerie line is gone, is it because nyx stopped it or..? If you know please let my know because I would love to buy more of them. The two from the lingerie line are more matte than the red one, so the red one is softer on your lips and they don't dry your lips out. They all stay on pretty good after drinking and/or eating. I'm gonna do some swatches now on dark skin (right) and "mixed" skin (left), I forgot to do some on white skin but you can find enough of them online so no worries!


I didn't edit the pictures so you can see how they look IRL. I hope you like how they look on those skin tones and I hope it helped you decide if you would like to add them to your collection as well! I hope all you makeup lovers liked this post and if you want to keep updated on when I post follow me on bloglovin' or twitter, you can also follow me by mail or on google+. I know it's a short post but I hope you enjoyed after all.

Love always,
Fauve♡

Monday, 7 November 2016

Popin cookin'


We've all heard of this before, if you haven't well now you have! Today I'm doing some popin cookin'. I've got my little set of donut popin cookin' from my sister's best friend who's in Japan for the moment and I was so happy with it! I wanted it for a while and now I've had it for a while and I'm making a blog about it. Let's get started!

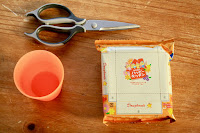
This is what you'll need :

  • Donut Popin Cookin' set
  • Scissor
  • A cup of Water


Let's get to it right away! What you'll want to do first is cut all the plastic in pieces and all of them have their uses. I'm holding a little piece of the plastic to measure the water and the biggest one is to make the dough in. Now, I'm starting with the big yellow bag and that the vanilla dough, add 4 little cups of water and mix it all togheter.


 Roll the dough in to 2 balls and put it in the plastics with the forms and push down and then take it out and their done! Do the same things with the big brown bag.


Now that you're donuts are ready we'll do the glaze, you'll have 4 more little bags 3 of them are glaze and the other one are little crunchy pieces to decorate with. Take the 3 glaze bags and let's do it!

Put the powder in to the little plastic form for the glaze, I used the one for the dough as well just to show you the 3 at a time. Starting from the left we have vanilla, chocolate and strawberry. Add one little cup of water and mix it all together until it looks like glaze!


Put the glaze in the little piping bag and cut the smallest bit off or big if you want a lot to come out at once. Now you decorate the doughnuts, let your imagination run lose and be creative! I wanted them to look good so I did the ones on the box this time, to make sure it's not a mess haha!


Ready to see me finished doughnuts? 


These are the first ones I made that actually look good/alright! I'm so happy with them and yes they are edible so if you want to eat it go ahead, I personally don't like the donut ones but I've heard there are some pretty good popin cookin' things out their. Some of my family members did like the doughnuts so it might just be me, try it out! Hope you guys enjoyed it and if you try it out yourself send me the pictures on twitter or instagram!

Love always,
Fauve♡ 

Monday, 31 October 2016

Jack O' Lantern

Happy Halloween!


I might not be the biggest fan of halloween, scary movies and being scared in general but I do loooooove pumpkins and pumpkin carving. Every year I love halloween season just so I can carve some pumpkins and today me and my sister carved some!

We all know how to carve pumpkins right? Take the top of, scoop the insides out, draw the face on it and cut everything out, put a candle in it and voila, Jack O' Lantern done! Everything in the pumpkin that you scoop out, you don't throw away! You do throw away the little things that look like hair in the beginning but the seeds you can dry out in your oven and put salt on it and you can eat the inside of that. When you carve out more of the hard stuff to make it thinner, don't throw that away either! You can make some soup with that, let it sit in warm water for about 15 minutes and then mix it and put some spices in their and you have pumpkin soup, you can even throw some potatoes in it to mix and make it thinner and some cut in small pieces to just put in the soup to eat. Mmmh!


What will you guys be doing for halloween or what do you do to prepare and decorate for halloween? I'll probably be watching a not so scary movie alone or with family and friends this halloween. I don't like to go places where I know I'll be scared, I'm the worst at halloween to be honest, my favorite part pumpkin carving and decorating the house. Do you like to be scared and do haunted houses and thing? Because yeah, no I can't do that. Halloween house party's don't really happen here and for the kids, they don't really trick or treat here either.. It's not that big of a deal here halloween, yeah okay our attraction parks do the halloween theme things, but that's pretty much it? Maybe their's some big halloween thing that goes on in Belgium that I don't know about? Who knows right.

Now are you guys ready to see our pumpkins finished? 


Cool right? I'm really happy with them! We also had fun making them and I also made the soup and seeds. My sister also has a blog go follow her : http://sarahtje007.blogspot.be , thanks! Hope you guys have a fun time with halloween. Trick or treating, partying, watching scary movies or doing scary things! 
Have a gOoOoOd halloween! (see what I did their, haha)

Love Always, 
Fauve♡ 


Wednesday, 14 September 2016

Peanut Butter Cookies


Hi everyone! As you can see today I'm making peanut butter cookies! I've never made them before and never even tasted them either so this is very exciting for me! I love trying new things and I also changed the ingredients a bit, but I always change thing up just a little bit haha. This recipe makes 29 cookies. I'm going to tell you guys, how I made. Let's get started!

The Ingredients :

  • 175g of flour
  • 1/2 tsp of baking powder
  • 1/2 tsp of salt
  • 225g of smooth peanut butter
  • 120g of soft butter
  • 200g of white sugar
  • 2 eggs
You will also need a scale, a sieve, baking paper, plastic foil and 2 mixing bowls. I'm sure you could do it with one mixing bowl but used 2.

Okay so now that we have everything we can begin!

First you'll want to sieve the flower, baking powder and salt in a bowl. (If you'd be doing it in one bowl, you would wait for this step.)


In a other bowl you'll want to put in the peanut butter and butter until it looks smooth like this.


Then to that you will add the sugar an mix that well for 1 minute and then when it's well mixed together you'll ad the eggs one by one while its mixing and make sure it all comes together good. It should look something like this.


Now you will add the flour in 2-3 different portions and mix that all well together and it should turn in to a dough.
Now that you have the dough, take the plastic foil and put the dough in their and make sure it's well together so make it a kind of round shape. Now put the ball of dough in the fridge for at least 2 hours.


Now the dough has been in the fridge for 2 hours take it out, take a fork and the baking sheets with the paper on it and we will start making the cookies! Before we get to it though, turn your oven on 180°C (356°F).


When your sheet is full of cookie dough balls, you have to take your fork to make the little design in them! It is very easy to do, first you will put your fork horizontal and then vertical and just like that you'll have to little design, watch the pictures below, I'll show it!


When all of the cookies are done you can put them in the oven for 10-15 minutes, all ovens are different so keep your eyes on them. When they are done, take them out of the oven and let them cool down for a bit. Once cooled on the sheet transfer them on a cooling rack and let them cool completely.


That's it, their done! Super easy and fun to do for the first time. I honestly enjoyed making this so much. I hope you'll try making these as well! If you use this recipe, post pictures on instagram and twitter so that I can see it and tag me in it! I'd love to see your pictures! Follow my blog so that you get a notification when I post a new one! Thanks for reading this post and I hope you enjoyed! 

Love Always, 
Fauve♡

Sunday, 11 September 2016

Chickpea Salad Recipe

Hey everyone! I'm a vegetarian and I've been for almost 2 years now. Since I've been a vegetarian I've been eating more chickpeas. Today I'm going to share you a salad that you can put on toast, a wrap just whatever you want to put it on or in. I honestly love this and I hope you do as well! Let's get started!


First you take your chickpeas and you put them in cold water until the next day. They should be about double the size like on the right picture above.
Then you will have to cook them on a medium heat for 1h30-2h, until they feel soft. Foam will form on top (mostly in the beginning) so you'll have to take it off. The water will also evaporate so you will have to check it a couple of times and add some if needed, which will probably be the case. You will probably have to add water about 3 times, definitely check because it may need more then 3. This is important because you don't want your chickpeas to burn!
Now that it's done cooking, pour the water out and rinse the chickpeas well. Little skins will come of you can throw them away or keep it in whatever you prefer, just rinse the chickpeas well. Once rinsed transfer them in a container, I directly put it in the one I'm going to keep it in.

Now what you need :

  • Chickpeas
  • Mayonnaise
  • Salt
  • Pepper
  • Fork


First you will crush the chickpeas with a fork until they are roughly broken. Big pieces can stay it's no problem and again these little skins will form you can take time to take them out, I just keep them in their, it doesn't bother me.


Now add about a tbsp of mayonnaise and mix it all around until it looks like this.


Then add the amount of salt and pepper that you want and your done! You can more or less, whatever you like. You can really do whatever you want.


It's done! It should look something like this! Now if you want you could add grated carrots in to this, or anything else you could thing of. The possibilities are endless. I like to keep it this way because I'm allergic to carrots so I keep it simple. Now let's put it on some toast and enjoy! 

You should try this out and enjoy it yourself! If you try this post pictures and tag me in it I would love to see it! I hope you enjoyed this post, if you did share it with everyone who would like this! As always follow my blog to get a notification when I post something new. 

Love Always, 
Fauve♡